Showing posts with label projects. Show all posts

Monday, September 05, 2011

Project: Name on the Wall

Had some free time to relax in the garage and knocked out a fun little project. Ya know those wood letters you get at the hobby store? They're a perennial favorite in our house. We've bought sets for each kiddo at different point and invariably they get painted some color to match the decor and hung on a wall. But, it doesn't take long to exhaust all the creative ways to display them. Horizontal, vertical, random, you get it.

This project actually found some new ground for us. I mounted them to a backboard of 1/4" MDF covered with fabric. This can create a whole lot of new possibilities for size, shape, color, pattern, etc.!

Some notes on the construction.

Letters can be hard to center vertically on a board. What you need is the overall width of the name, so...
  • Lay out the letters along a yard stick. Pick a set space for the distance from letter to letter. 
  • Use the yard stick markings to get the total length. 
  • On your backboard, draw a 'baseline' for the bottoms of the letters and mark the center point
  • Start placing the letters 1/2 the length of the name to the right of center
Attaching the letters with short wood screws is best, but knowing where to drill the holes from the back can be tough. Here is the solution:
  • With the letters laying where you want them on the backboard, trace them with a pencil
  • Remove the letters and drill small holes from the front so that you can easily locate them in the center of the letter.
  • 2 holes is plenty for any letter; you want more than one so the letters don't 'swivel.'
  • Place the letters back on the backboard (small clamps are a good idea here if possible) and pre-drill the letters through the holes in the backboard from the back - be careful of how deep you drill!
Finishing the backboard can be done in a number of ways. We used fabric glued down with Mod Podge, but contact paper, paint, wallpaper, scrapbook pages, photos ... just about anything flat can work! Obviously, you'll do this step with the letters off and reattach them afterwards. Here is the finished product in place!
The new sign installed

Wednesday, November 25, 2009

Playsets and Good Friends

From Project Playset
This post is a tribute to some really great guys that really lent a hand when needed. The story starts back in September when we found an incredible deal on a playset. Big playset ... little price. We drove over to check it out that night with cash in hand and suddenly it was ours. One big problem remained though: getting it home.

This is where the guys come in. I hit the phone lines and started down my list: Wil, Kyle, Clinton, Chris... I was getting lots of yes's, too. I was clear that this was going to be a big effort since the set was in a backyard with no gate. Wil even threw in his big trailer for the hauling part. The next morning at church, we roped Mike in, too. This was easily the best staffed project we've undertaken in a while!

We descended on that little playset that afternoon and it was awesome. We could have stocked a small hardware store with the tools we collectively brought. There were guys everywhere attacking it with all manner of battery-powered wrenches and sockets. Parts were flying off - slides, ladders, the little house on top. Then just as quickly they were loaded, hauled and dropped off in my back yard. My head was spinning!

This weekend we repeated the job. It was time to re-assemble it. Again, I called a few guys and they showed with all the requisite muscle and tools! This time Wil and Clinton were back as well as Brandon and Michael. It was amazing how quickly it went back together. Especially impressive was the part where we hefted the club house up onto the legs. We got video of that knowing that we would either record greatness or win 10K on America's Funniest Videos!

The playset now sits in our backyard crawling with our kiddos on a regular basis. I hope these guys know what a blessing you've been to me in this. Thanks for your time, tools and muscle!

Monday, October 05, 2009

Patio Cooler Project

My latest project in the garage has been a cooler for the patio. I'd seen an item like this for $100 at HEB and decided to make my own. I used cedar fence pickets for the wood, a $.99 styrofoam cooler from CVS and some hardware from Lowes. All-together, it would have been under $50 (I think), but I already had about half the pickets.

Isaac helped me get the wood ready. We pulled out a bunch of cedar fence planks left over from a new fence almost 2 years ago! I cut the boards for the sides and kept them together so their grain pattern would run around the box. The lid was essentially a "face-frame" - 4 boards butt joined with pocket screws. I got to use my Kreg Jig for this part - Fun!

The legs actually took 2 trys - the boards were very rough and the joins would not conform to a 90 deg. angle, so I took them apart. and cleaned up the joining edge and face on the table saw. Then, I glued and nailed them. They were much more solid after that!

I glued up the side panels, lid, and bottom to make assembly easier and give the box more rigidity. Again, all joined edges were run on the table saw (in lieu of an actual joiner which would've been the better tool). I dadoed the sides to trap the bottom and dry fit these pieces to check sizes and joints. This is where I realized the bottom was a 1/4" too wide. That's better than being too narrow, though!

With the box done, I clamped on the legs and stood it up on the table saw (because it is a lot more level than my Garage floor!) and adjusted the legs so it wouldn't rock. With the legs all clamped at the right length, I attached them to the box with 1" wood screws from the inside. Knowing the box will weigh a lot with ice and drinks, I used ample screws - 8 per corner! Tim Taylor would be proud!

The last step was attaching the top. I added hinges under the front edge of the lid frame so the top could be opened in order to get at the cooler. The lid itself was hinged in the back with a handle up front. All the hardware was black, antique styled items from Lowes.

Now to fill the cooler with drinks and the house with friends! Sounds like another great reason to use the grill!

Sunday, February 08, 2009

Getting Our Fins On Straight

From Model Rocket Fin Guide
So here is the predicament: How do you let your 5 year old be involved in the construction of their own model rocket without having it turn out unflyable? Isaac and I have had a blast with model rockets, but I am adamant that he be involved in the construction. This sometimes leads to a trade-off between his involvement and the "fly-ability " of the rocket. It is one thing if the stickers don't go on straight but quite another if the fins don't!

This got me to thinking of how I can set him up to be able to do the fins himself but still have a chance at this rocket flying in a straight line. The answer was a home-made rocket fin alignment guide. I'm pretty proud of the idea. It is limited in that it doesn't deal with the angles or spacing of the fins, but it does provide a flat surface for the fins to lie on and slide up to the rocket body. This is something more within the ability of a 5 year to do successfully.

Here is the basic idea. I cut a 45° angle bevel down the side of 2 boards. When the boards are placed facing one another, they create a "channel" in which the body of the rock can lay. This necessarily lines up the two boards with the body tube. I cut one board 4" short of the other so that its inside face makes a flat area along the side of the rocket body. Lay the fin on this surface and it is necessarily in line with the body. All that is left is to put glue on the edge of the fin, lay it down and slide it up to the rocket. Isaac can be much more involved now - we both love that!

Download a 3D model of it from the 3D Warehouse for Google SketchUp.

Here are some pics...

Tuesday, August 05, 2008

Learning From the Best

Recently I had a chance to do some woodworking with a friend, Ken. In fact the friend is actually a pastor at our church - the very one that conducted our ceremony when Cheryl and I married. Before that, he and his wife did our pre-marital counseling, and before that, he spent a lot of Friday mornings at the local Denny's letting me weigh my heart on the subject of this beautiful, fun, caring, godly woman I'd met 3 years into giving up on dating.

It was a real treat to tag along. The project was moderate in scope - 2 tall boxes with minimal trim to serve as offering collection places in our church. From the beginning, though, it was easy to pick up bits of wisdom in everything from how to saw the sheet goods to how to set up your shop. If we'd never said a word, I would have learned a lot.

It is interesting how that process applies in so many areas. As Cheryl and I have begun working with the college and career group at our church, many of the things that I learned from Ken early on have come back to me. I try to use them to bless the men in the group that I now get to sit with.

As the Lord would have it, one of these men, is now about to marry Ken's daughter who was in the early years of high school when I first came to our church. Drew and I have met for coffee a number of times and I can only hope that I've been half the help Ken was to me. If I've done any good at all, it is because of those like him that showed me how. Ultimately, we owe it all to our ultimate teacher, Jesus.

The boxes were completed, by the way. Ken wrapped up the project and had them in the sanctuary by Sunday. They looked great!


Posted by Picasa

Sunday, August 03, 2008

Our New Kazeebo!

Yes. If you were wondering a "Kazeebo" is the same as a Gazeebo. Isaac wasn't real clear on the name and the fact that we enjoyed the new name so much didn't help, so it is a "Kazeebo" now! ...And a really cool one at that!

This is the next project as we move (back) into our house. We've got a lot of plans and this one involves taking down the old crazy looking gazeebo(-esque) thing in the backyard and putting up something prettier - maybe something without cheap lattice tacked to 2x4's.

Big thanks to our friends Kyle and Kelly - they had the kit in their garage and passed it along to us. They were happy to have it out of the garage and we are happy to have this step get a big boost in the budget department!
Posted by Picasa

Saturday, May 31, 2008

Honey-do Ninja

I think I beat my all time record today for honey-do execution! I gave myself a bit of a head start by starting on the garage door opener Thursday! But I still managed to finish that (and it works!) as well as install a junction box cover, put in 2 GFCI's in the Kitchen and caulk the trim around a door! Yeah - it is not all that much, but given all that is going on lately, I felt pretty good about it!

The thing about honey-do's these days is that they are not just the run of the mill stuff. These are borderline construction projects. My short list right now includes 4 screens to replace, siding to repair and some sort of valve thing on the water heater to replace (which I think is going to involve draining the whole darn thing!) And, they aren't really just coming from Cheryl either! most of what I'm doing now is to try to sell the house. AHHHHH so much to (honey) DO!

Saturday, March 08, 2008

The Monitor Stand Project is Done!

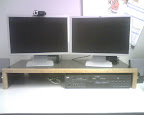
I wrapped up the monitor stand project last weekend. The finishing touches proved to be the toughest part - mainly the finishing! I was using good, furniture grade ply but not stain grade (Birch or Ash) I think. Nice and smooth but not really for a wood grain finish. So, I had planned on a black, glossy finish - somewhat like the phone holder I made a while back. I didn't want to get too involved with the painting so I set out to use black spray paint. I did get the good stuff, but even that proved a little difficult to work with.

The first coat was badly 'fisheyed' - marked up with little blemishs that look like little circles where the paint didn't go on. It's caused by surface impurities. My professional finisher friend, gave me some advice though that I'm sure that I'll use in the future! Prep normally by sanding and wiping/blowing off dust, but then wipe the surface down right before you paint with mineral spirits (paint thinner)! Then, put down a couple of light coats just a few minutes apart. 2-3 coats with cover pretty well and is all you want to do in one 'session'. Let that dry for a day, sand very lightly wth 200 grit paper (or so) and repeat it - wipe down and spray. The mineral spirits remove the impurities from the surface and help the paint droplets to flow together. This also reduces the "orange peel" effect that you can get. The pic above it the finished product in place. Here are a couple more 'almost done' pics:


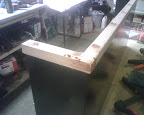
After nailing the face frame on (red oak scraps, milled to 1"x3/4") the holes are puttied and later sanded.

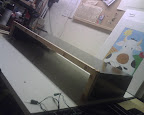
I had to 'test' it on the table top -really, I was just dying to see it like it would on a desk. I like!

Wednesday, February 13, 2008

New Project - Monitor Stand

I had a chance recently to reorganize my office. In the process I decided that I needed something to get my monitors up about 5 inches. Of course, I could have gone over to OfficeMax and picked one up, but this looked more like a great opportunity for ... "Dun, Dun, Daaaaa" ... a PROJECT!

I'm going to be using the left over ply from Julia's Toy Cabinet for the body. But I'm also going to addsome support in the center and a hardwood face frame (red-oak; also left over from previous projects).

I did have some fun on the body - I didn't want to show the plywood edges on the top or the sides and I didn't want to run trim down the side to hide it. So, the solution was to cut the pieces at a 45 degree angle and join them with glue and nails. I happened to have some nifty little 90 degree angle clamps that came in real handy for this! The body is done now and awaits paint before I do the face frame.

Sunday, February 10, 2008

A Neeeewwwww Saw!

It's not a new car. It's not even new. But, I'm pretty stoked about it. I've been wanting a Compound Miter Saw for a while. I've even considered settling for an "el cheapo", but a good friend hooked me up recently! He had a saw in his garage that he was willing to part with and offered it to me for a pitance! It's not an 'el cheapo' either! It is a full size DeWalt 12 inch. Joy! Oh the things I can cut with that!

I have a special place in my heart for this particular model, too. One of the first scene shops I worked in had no real tools to speak of. After getting a couple of the basics - hand tools and a circular saw, this was the tool I bought for the shop! It is great to have one at hand again.

Sunday, February 03, 2008

Caution: Nerd with Power Tools

So I'll have to be honest, I do have quite the proclivity for all things techy (and big words like proclivity!). So naturally I carry a high-tech, shiney, black, does-everything-but-make-the-bed blackberry cell phone - the "Pearl", in case you wanted to know. But my gadget orientation has always included power tools as well. I really dig wood-working and most projects in general that involve tools that could remove one of your limbs if not handled properly. Blackberrys don't tend to do that.

I finally have found a project that properly unites these two domains - behold, the hand-crafted wooden cell phone cradle! This beauty is a one of a kind featuring hardwood construction using red oak and rosewood and a high gloss black lacquer finish. It is a thing of beauty that true nerds don't get ... and true woodworkers can't see the need for. Sadly, this is a one of a kind. I'll not be taking orders for more of these. You'll have to find some other techy-wood head!

Tuesday, January 22, 2008

Weapons of Mass Instruction

Ok, raise your hand if you got spanked as a child! ... Yes - my hand is up. I did get more than my fair share of "whoopin's." I know my brothers got their's too! Spankings around our house were meted out with pretty much whatever was at hand as needed but the "Red Paddle" was the official disciplinary instrument - made by my dad at some point, it was simple and effective ... and a very telling shade of red. This thing had a serious impact on us. When we wanted to argue, debate, plead or whatever, the Red Paddle was the ultimate arbitrator!

We knew what it meant and even went to great lengths to 'get rid' of it. It got hidden in progressively harder to find locations - under dressers, behind cabinets, etc. At one point, it was lost so long that we really thought it was gone for good! But, lo and behold it has returned!

This Christmas the gift that most caught me off-guard was - YEP - the RED PADDLE! I couldn't believe my eyes! It is not a fearsome thing to behold but it certainly stirred some memories. I do feel honored that I was chosen to be it's recipient, but I was a little sad that Matt and Jake wouldn't have it. Now that we all have children, this is going to become more of a practical need! But, it was more out of a (warped!?) sense of nostalgia that I decided to make them replicas of it.

The replicas are authentic in size, shape and thickness. I struggled with whether I should send them - didn't want to communicate anything negative. This was just a humorous way to share the memory. Of course, it is a "working" model, too!

Sunday, January 20, 2008

Please Be Make Plaster Car Fun!

Cheryl found a fun gift for Isaac for Christmas (among the many fun gifts that she is so good at finding) - a "Make a Racer" kit. It allows you to make a working race car out of plaster of paris and some plastic accessories that come in the kit. It even included paint. What it didn't include where directions written by an English speaker!

The directions read like the output of some of these automated translators (likely because it was!). Phrases like "step 2 ... Cuts open the bag of plasters and put them into the mixing bowl." and later the warning that began, "Be reminded ..." made the instructions somewhat difficult to follow!

After having a bit of a laugh at some of the directions, I grabbed Isaac and we got started making the car. The mixture instructions were vastly miscalculated, though and I wound up with far too little water in the plaster. I had put it in a zip-loc baggie thinking I cut just cut the corner off and let Isaac squeeze it in ala pastry tool ... uh no. He looked at me after a second and said it was too hard, so I tried. By brute strength and determinaton I managed to extrude something that bore little resemblance to anything I'd discuss in proper company and certainly not a race car. I then again tried to enlist Isaac in mashing the ... uh, extrusion into the race car mold.

Half an hour, Oila! later we had a very hard plaster model of a ... uh, extrusion. Isaac was non-plussed - he was ready to add wheels. I pointed out that the plaster had been too hard to put in the axles and promised that we would try again with better plaster. The failed model quietly disappeared later that night.

The happy ending is that after a trip to Hobby Lobby (a favorite store in our family) and a second attempt with more legible instructions, we did manage to produce a car worth of the roads! Isaac has yet to paint it but he did help spray it green until he can find time to 'detail' it!

Tuesday, January 01, 2008

The Golf Ball Game Needs a Name

One of the big hits during this year's Christmas trip to Arkansas was the "Golf Ball Game". What is that? Well, that is a bit tough. It is a lot like horse-shoes with points being scored for throwing an item around a target, but the item is two golf balls connected with 14" of rope and the target is a PVC pipe contraption.

With our New Year's Eve Party in mind, I set out to make one of my own yesterday and it wasn't too bad. Isaac and I hit the Home Depot and got about 60 feet of 3/4" PVC, 12 T's and 12 elbows and the cord. Then we headed to Academy for the golf balls. I was a bit funny explaining to the eager sales person that I didn't need anything special - just 12 colored balls that could have a hole drilled through them.

The game took about an hour to make. I cut the PVC into it's pieces with my table saw and connected them to make the 'targets'. Then came the fun part - drilling holes in golf balls. I had a couple of slip ups which meant some scuffed up balls and one clamp with burned out pads where the ball got loose and spun on the bit. Isaac helped with every step, though and we finally got it all done!

I did meet someone else who has played it and they added some interesting rules, like the one where if you get all 3 throws on the same 'rung' you get to TRIPLE your score for that round!

If anyone out there knows of an official name or rules - I want to know!

Monday, September 03, 2007

Back To My Woodshop


Gettin' Jig-gy
Joe showed me how to make this jig for drilling the peg holes. The wood block on the drill bit keeps it from going too deep.


Gut Check
The moment of truth is when you slide the bins in that the cabinet was made to hold... they fit. Whew!


Almost There
It is assemble, nail holes puttied and sanded. Now for the trim!

Things at work have settled a bit lately and I've found the time to get back into the garage to work on some projects. One of these projects is a toy bin area for Julia's room. Sadly, I haven't been using my garage workshop much lately, but this project dates back much further than the summer. We had big plans early on for Julia's room and a few of them (the ones I was in charge of) never came together - wall cut-outs like we did for Isaac and this toy cabinet. But, I'm back at it now.

This project is unique in that it will mark the first real 'cabinet' I've done on my own and in my own 'shop.' I've done a lot of projects and even some pretty big ones, but none like this where the finished product will be a nice piece of furniture. A few years ago, I started hanging out with my friend Joe at his shop (he does woodwork). We built the pantry that stands in the kitchen now. But that was built at Joe's shop - with a sizeable bit of input, labor and know how from Joe. Since then I've assisted him on 3 or 4 entertainment centers and even an on location install. I've been learning from the best! Joe did come in and give some input on this project, to be sure, and for that I'm thankful.

Some details: The cabinet is around 36" tall, 14" deep and 28" wide. It has an off-center divider and adjustable shelves for both sides. It's made of 3/4" furniture grade plywood with hardwood trim and nosings to hide the the front edges of the plywood. At this point the cabinet is almost done. It needs a back piece to be cut from 1/4" ply and all the hardwood trim. Once that is done, it is off to the painters. It will be painted at Joe's dad's shop where he has all the gear for a professional finish. (I have no plans for installing a vented paint room!).

I'll post on it again when it is done!